Showing posts with label baking. Show all posts

Sunday, 11 October 2015

Baked Oats

Baked porridge is one of my favourite breakfasts to make on the weekend. It's so warming and delicious - perfect for the cold winter months that are rapidly approaching..


..and by cold, I mean rain.

The riper your banana is, the sweeter and creamier this will be. I like to make mine with cinnamon and maca but you can add whatever you like really! 


Serves 1. I make mine in a small square dish, around 10cm x 10cm!

Ingredients
50g oats
1/2 tsp cinnamon 
1/2 tsp baking powder
120ml almond milk
1 ripe banana (if it's a big banana, reduce milk to 100ml or just use half)
1 egg white

Optional: 1 tsp maca powder, blueberries, frozen raspberries, walnuts

Method
1. Place the oats, cinnamon and baking powder (and maca if you are using it) in a bowl and mix to combine.

2. Pour in the almond milk and leave to soak for 10 mins.

3. Mash the banana. Separate your egg and whisk the white in a small cup.

4. Add the banana and egg white to the oats. Add your extras like fruit or nuts and stir to combine everything.

5. Smooth the top of the mix and bake in a preheated oven at 150 degrees C for 20 mins.

6. Serve with fresh fruit, nut butter, compote, yogurt, granola, cacao nibs - whatever takes your fancy!


With mango and passionfruit greek yogurt, stewed apple and granola


With coconut yogurt, blueberry compote, pomegranate, almond butter and granola

Thursday, 23 July 2015

Cinnamon Buckwheat Pecan Granola

Granola is one of life's simple pleasures. From the smell that fills the kitchen when it's cooking, to the cacophony of crunches as you eat it, to the heavenly taste of toasted titbits, it's a treat to every sense in the body - and it's so simple to make too. 
Of course, it's a danger to have around my house, seeing as my father appears to be a descendant of this little guy:
Unfortunately, ordinary almonds are not as evasive as Scrat's adored acorn, and the nut count of my granola tends to diminish at a disproportionate rate. Leaving it to cool is the most treacherous part of the process. No nut is safe. I'm even considering calling in Rodent Control to help me contain this problem. 

This is my favourite recipe at the moment - I love the texture added by the buckwheat and I'm a tad obsessed with wrinkly ole pecans. Feel free to use whatever nuts you like though - cashews and walnuts also taste great in this recipe!


Ingredients
300g oats (use gluten-free ones if you wish)
150g buckwheat groats
50g desiccated coconut
100g pecans
100g whole almonds
100g flaked almonds
100g pumpkin and sunflower seeds
2 tsp cinnamon
4 tbsp coconut oil
4 tbsp honey/maple syrup
1 tsp vanilla extract
100g cranberries or sultanas
50g goji berries

Method
1. Put the oats, buckwheat, coconut, nuts, seeds and cinnamon in a large mixing bowl and mix together.

2. Melt the coconut oil and honey together in the microwave. Add to the mixing bowl along with the vanilla extract and mix well.

3. Spread the granola on a baking tray and bake at 150 degrees for 15-20 minutes, turning regularly to ensure it toasts evenly.

4. Remove from oven and add the cranberries and goji berries. Allow to cool (under a watchful eye, if you too have a Scrat infestation in your house ;) )

Enjoy for breakfast with banana and almond milk, as a mid-day snack or even as dessert with some fruit, cacao nibs and coconut yogurt :) 


Monday, 6 July 2015

fal-Awfully Good Falafels

Adored by vegetarians and meat-eaters alike, falafels are tasty, cheap and relatively healthy - and surprisingly quick and easy to make! I've been wanting to make my own for a long time, and finally got around to it last weekend. I decided to try baked falafels for a healthier take on the traditional fried version, and the results were just as delicious. 

Ironically, the first time I tasted falafel was in Thailand of all places, and I ended up with a nasty vomiting bug on a 4 hour bus journey later that day. Delightful. However, I was not deterred. And neither should you be. Go on - ditch the chicken and make these cheeky chickpea nuggets tonight instead ;)


Baked Falafels

Makes 8-10 falafels, depending on how large you make them!
Suitable for vegetarians and vegans. Dairy free and easily adaptable to be gluten free.

Ingredients
1 400g can of chickpeas, drained and rinsed
1 small onion, finely chopped
2 cloves of garlic, finely chopped
1 1/2 tsp ground cumin
1/2 tsp chilli powder
2 tbsp plain flour/ground almonds for gluten free option
2 1/2 tbsp lemon juice
1 bunch of fresh coriander, washed and chopped
a good pinch each of salt and pepper
sesame seeds 
oil of your choice (I use rapeseed)

Method
1. Preheat the oven to 200 degrees Celsius.

2. Place 1 tbsp of oil in a non-stick pan over a medium heat. When the oil has warmed, add the chopped onion and garlic, 1 tsp of the cumin and the chilli powder. Fry for 3-4 minutes until the onions have softened.

3. Place the chickpeas, lemon juice, coriander, salt, pepper and remaining cumin into a food processor. Add the fried onion and garlic. 

4. Mix to combine. Taste the mixture and add more seasoning if you wish. 

5. Transfer to a mixing bowl and add the flour/ground almonds. Combine with your hand to form a dough. 

6. Use your hands to form small balls of the mixture. 

7. Pour some sesame seeds on to a plate. Roll your falafel balls in the seeds to coat.

8. Place the falafels on a foil-lined baking tray and place into the fridge for 15 minutes to firm up. 

9. Remove from fridge and drizzle with 1 tbsp of oil. Bake for 20 minutes, turning occasionally.

Wasn't that (Leban)easy?! :P

To serve:
Cous cous salad - cous cous is really versatile and you can add so many things to it to liven it up. I like to cook the cous cous in vegetable stock and mix through some pomegranate seeds, chopped toasted almonds/pine nuts, feta and fresh coriander. 
Hummus (lashings of it)
Warm wholemeal pitta breads
Lettuce
Tomatoes

Wednesday, 6 May 2015

Pear and Almond Buckwheat Scones

If you think this sounds familiar, you're right - the first recipe I posted to this blog was one for pear scones. It's a favourite scone flavour of mine (then again, every scone flavour is my favourite. #sconelife) 

Here, I've adapted the recipe to make a gluten-free version with buckwheat flour, simply because I felt like experimenting and I'm always interested in trying different varieties of scones. Buckwheat flour is really fine, so be careful when adding the liquid - don't add it all in one go or things will get very sticky very quickly (ahem).


Pear and Almond Buckwheat Scones
Ingredients

2 and 1/2 cups buckwheat flour
1/2 cup ground almonds
50g caster sugar
1 tsp baking powder
pinch of salt
100g butter (I use Flora)
1 tsp vanilla extract
1 egg 
100ml buttermilk
2 ripe pears, peeled, cored and chopped
flaked almonds to top

Method
1. Preheat your oven to 220 degrees (200 degrees fan oven). Allow the oven to heat up fully - this helps the scones to rise. Sprinkle some flour on a baking tray. 

2. Mix the buckwheat flour, ground almonds, sugar, baking powder and salt in a large mixing bowl. 

3. Add the butter and, using your fingertips, rub it into the flour mixture until it resembles dry breadcrumbs. Try not to handle it too much. 

4. Crack the egg into a mixing jug and beat with a fork. Add the buttermilk up to the 120 ml mark.

5. Pour about 2/3s of this into your dry ingredients. Add the vanilla extract and the chopped pears.

6. Bring the mix together with your hand. You can add more of the liquid as you need it, but keep a little bit to use as a glaze at the end. 

7. Turn the mixture out onto a floured surface and roll it out to a 4-5cm thickness. Using a scone cutter, cut out your scones and place them on to the baking tray.

8. Brush the tops of the scones with your left-over egg mix and sprinkle some flaked almonds on top. 

9. Bake for 15-20 minutes, until golden-brown. 

10. Smother with jam and pair with tea. Amen. 

Friday, 27 March 2015

Wholemeal Oat Banana Bread

If the thought of a warm slice of banana bread and a cup of tea doesn't summon saliva to your mouth or make your stomach dance with desire, then you should probably get that checked out. :P

Banana bread is a much-loved tea time treat, and is often viewed as a healthy opinion (eh, it's got fruit in it like, so obviously it's not bad for you? Obviously.). This can be the case, but some recipes do contain a lot of sugar and butter - so this is my version of a healthier banana bread, which is sugar and butter-free. If you want to make it vegan, omit the egg and reduce the flour to one cup, and substitute the honey for agave syrup. 
It won't rise as much as a regular loaf of banana bread, but it's got a really nice texture due to the oats and dessicated coconut (which I am currently having trouble leaving out of any recipe I make. Scones? Chuck it in. Cookies? Chuck it in. Thai curry? Sprinkle a bit on top. Shepherd's pie? Must..not..reach for coconut...)

So quit monkeying about, and whip up a loaf of this pure joy :)


Ingredients

1 1/2 cup flour - I use wholemeal or spelt
1 cup oats
1 heaped tsp baking powder
1/2 tsp baking soda
1/2 cup dessicated coconut
2 tsp cinnamon
1 egg
1/3 cup honey (or agave)
3 tablespoons coconut oil
1 tsp vanilla extract
4 ripe bananas, mashed
Pumpkin or sunflower seeds to sprinkle on top
Optional - walnuts, dark chocolate chips, raisins


Method

1. Line a loaf tin with baking paper. Preheat your oven to 150 degree C. 

2. Place flour, oats, baking powder, baking soda, dessicated coconut and cinnamon into a large mixing bowl and mix together.

3. Place the coconut oil in a bowl with the honey and vanilla extract and melt in the microwave on a low heat, stirring regularly.

4. Add this, along with the mashed bananas and egg, to the dry ingredients and stir together until fully combined. If using any of the optional ingredients, stir them in once the mix is combined.

5. Pour into your loaf tin. Smooth the top with the back of a tablespoon and sprinkle some your seeds on top, pressing them in lightly to make sure they stick.

6. Bake for 50-55 mins or until a knife inserted into the centre comes out clean.

7. Enjoy! :) This tastes delicious with almond butter on top, or serve with some yogurt and berries as a healthy after-dinner treat. If you are worried about it going stale, slice half the loaf and freeze it. You can just take slices out as you want them and pop them in the toaster!

Friday, 16 January 2015

cinnamon and chia seed pancakes :)

...also known as oatmeal banana pancakes. But cinnamon and chia sounds much more exotic ;)

These are really easy to whip up and they taste deeelicious. I honestly prefer them to normal pancakes. They are pretty healthy too - flourless and sugar-free - which means of course that you can eat twice as much as usual. That's my logic at least.. ;)


As Soulja Boy would say, stacks on stacks on stacks..   

Ingredients

Serves 2

 - 2 bananas
 - 2 eggs
 - 1/2 cup oats 
 - 1/2 tsp baking powder
 - 1/2 tsp cinnamon 
 - 1 tsp chia seeds (you can use 1 tsp ground linseed if you don't have chia)
 - pinch of salt

Method

1. Place all of the ingredients in a blender. 
2. Blend to combine. You can choose how smooth you want the mix to be - I like to keep a little bit of bite to the oats.
3. Heat a non-stick frying pan over a medium heat. Fold a piece of kitchen towel in half and moisten with oil (I use coconut). Carefully rub the pan with oiled towel.
4. Using a tablespoon, place 2-3 spoonfuls of the batter on the pan, depending on the size of your pan. Make sure to only put one spoonful per pancake.
5. Fry until golden-brown on both sides.
6. Serve with your choice of topping - maple syrup, fresh fruit, yogurt, coconut, almond butter.. The choices are endless! 
I like mine served with low fat vanilla yogurt, blueberries, banana, toasted coconut, a dollop of almond butter and a drizzle of honey. Mmmmm...
To make a really quick berry coulis (as seen in the picture below), place a handful of mixed berries in a bowl and sprinkle a little sugar on top. Heat in a microwave on high for two minutes, stirring after one minute. 


Top with some toasted almonds and low-fat greek yogurt. If you're not drooling yet, you need your taste buds checked. 

Monday, 8 December 2014

caramel without the cavities ;-)

I'm on a Psychiatry rotation at the moment, and though I'm really enjoying it, Tuesdays are a day that all my group used to dread. We have lectures from 9-5 in a stuffy little room in St Pat's on some pretty heavy-going topics. Come 5pm (come 3pm even), brains are fried and at least half the class is asleep/playing on their phones/AWOL. 
One of the girls in our group was more astute. Anna observed our battles to stay awake, watched our incessant scrolling through Facebook, took note of all those tactical toilet breaks. She recognised the need to make Tuesdays a little less heinous and a little more delicious. And so Treat Tuesday was born! 

Each week, 3 or 4 people from the group bake something and bring it in to share at our 11 o'clock break. Offering have included brownies, cookies, fifteen's (a delicious Northern Irish treat), malteser squares and a very impressive Pavlova and Yule Log (although maternal involvement was suspected in this case). The ensuing sugar high is enough to keep you going till, well, at least 3.30pm. 

When my turn to bake for Treat Tuesday came around, I decided to experiment. I had wanted to try out date caramel for awhile and happened to have a bag of dates in my cupboard at the time (pilfered from home, of course :P), so I thought I'd try a healthy version of the delicious classic millionaire shortbread. 
I was a bit worried about how they would go down amongst my classmates - not everyone is a bit of an 'eat-clean' hun like myself - but the empty lunchbox by 11.15 told me that they were a success! Nobody seemed to notice the difference - even my housemate Rachel, caramel shortbread fanatic and simultaneous raisinphobe, ate one and thought it was delicious ;) 

These squares are no-bake. The base is gluten-free, dairy-free and vegan and the caramel is dairy-free and refined sugar free and can easily be made vegan by substituting honey for agave. I used normal chocolate on top but this also could be easily substituted for a vegan alternative :)
Use a square brownie tray to make these. 


Healthy Caramel Squares

caramelly heaven..

Ingredients
Base
180g ground almonds
100g oats
4 tbsp coconut oil, melted
2 tbsp honey
Optional: 50g desiccated coconut

Caramel
250g pitted dates
2 tbsp honey/agave
1 tbsp smooth almond butter
1/2 tsp vanilla extract
Dash of water

Topping
150g milk or dark chocolate

Method
1. Place the oats, ground almonds, sugar and coconut if using into a food processor and blitz briefly. Sitr in the coconut oil until combined. (If using honey, omit the sugar and melt the honey with the coconut oil.)

2. Press the mix firmly into the base of a tin lined with parchment paper - I had to use a large lunchbox and cling film due to lack of resources :P Place this in the freezer for 20mins until firm.


3. In the meantime, make the caramel. Place the dates into the food processor and blend until they have broken up and are starting to look like caramel. Add in the honey, almond butter and vanilla extract and blend to combine. Add a small amount of water - just enough that is necessary to loosen the mix. 

4. Take your biscuit base from the freezer and spread the caramel evenly on top. Return to the freezer for 1-1.5 hours until the caramel has set.


5. Once the caramel has set, remove the tin from the freezer. Melt the chocolate and spread on top. Allow to harden. 

6. When it comes to cutting the squares, take a cup of boiled water and a knife. Heat the knife in the water for a few minutes, wipe dry and then use to cut the chocolate. This should stop the chocolate breaking in large chunks and give you a clean cut. 

7. Store the squares in the fridge overnight or until you're ready for some guilt-free indulgence! :)


Sunday, 16 November 2014

spelt for choice :-)

I headed down to Athlone this weekend to visit my parents and avail of some lovely home comforts - the fireplace, the fridge, the fully-functioning shower.. One of my favourite things to do at home though is to take advantage of my mother's well-stocked cupboards and proper kitchen equipment - things our student house is definitely lacking - to bake and cook!

I'd planned on making coconut scones this weekend, after tasting a delicious one in Le Petit Parisien during the week. When I opened the press to get out my ingredients, an unfamiliar bag caught my eye. Wholewheat spelt flour. Hmm. I'd heard of spelt flour but had never used it in baking before. So I decided to experiment!


This is the flour I used - available in Holland and Barrett for €3.99!

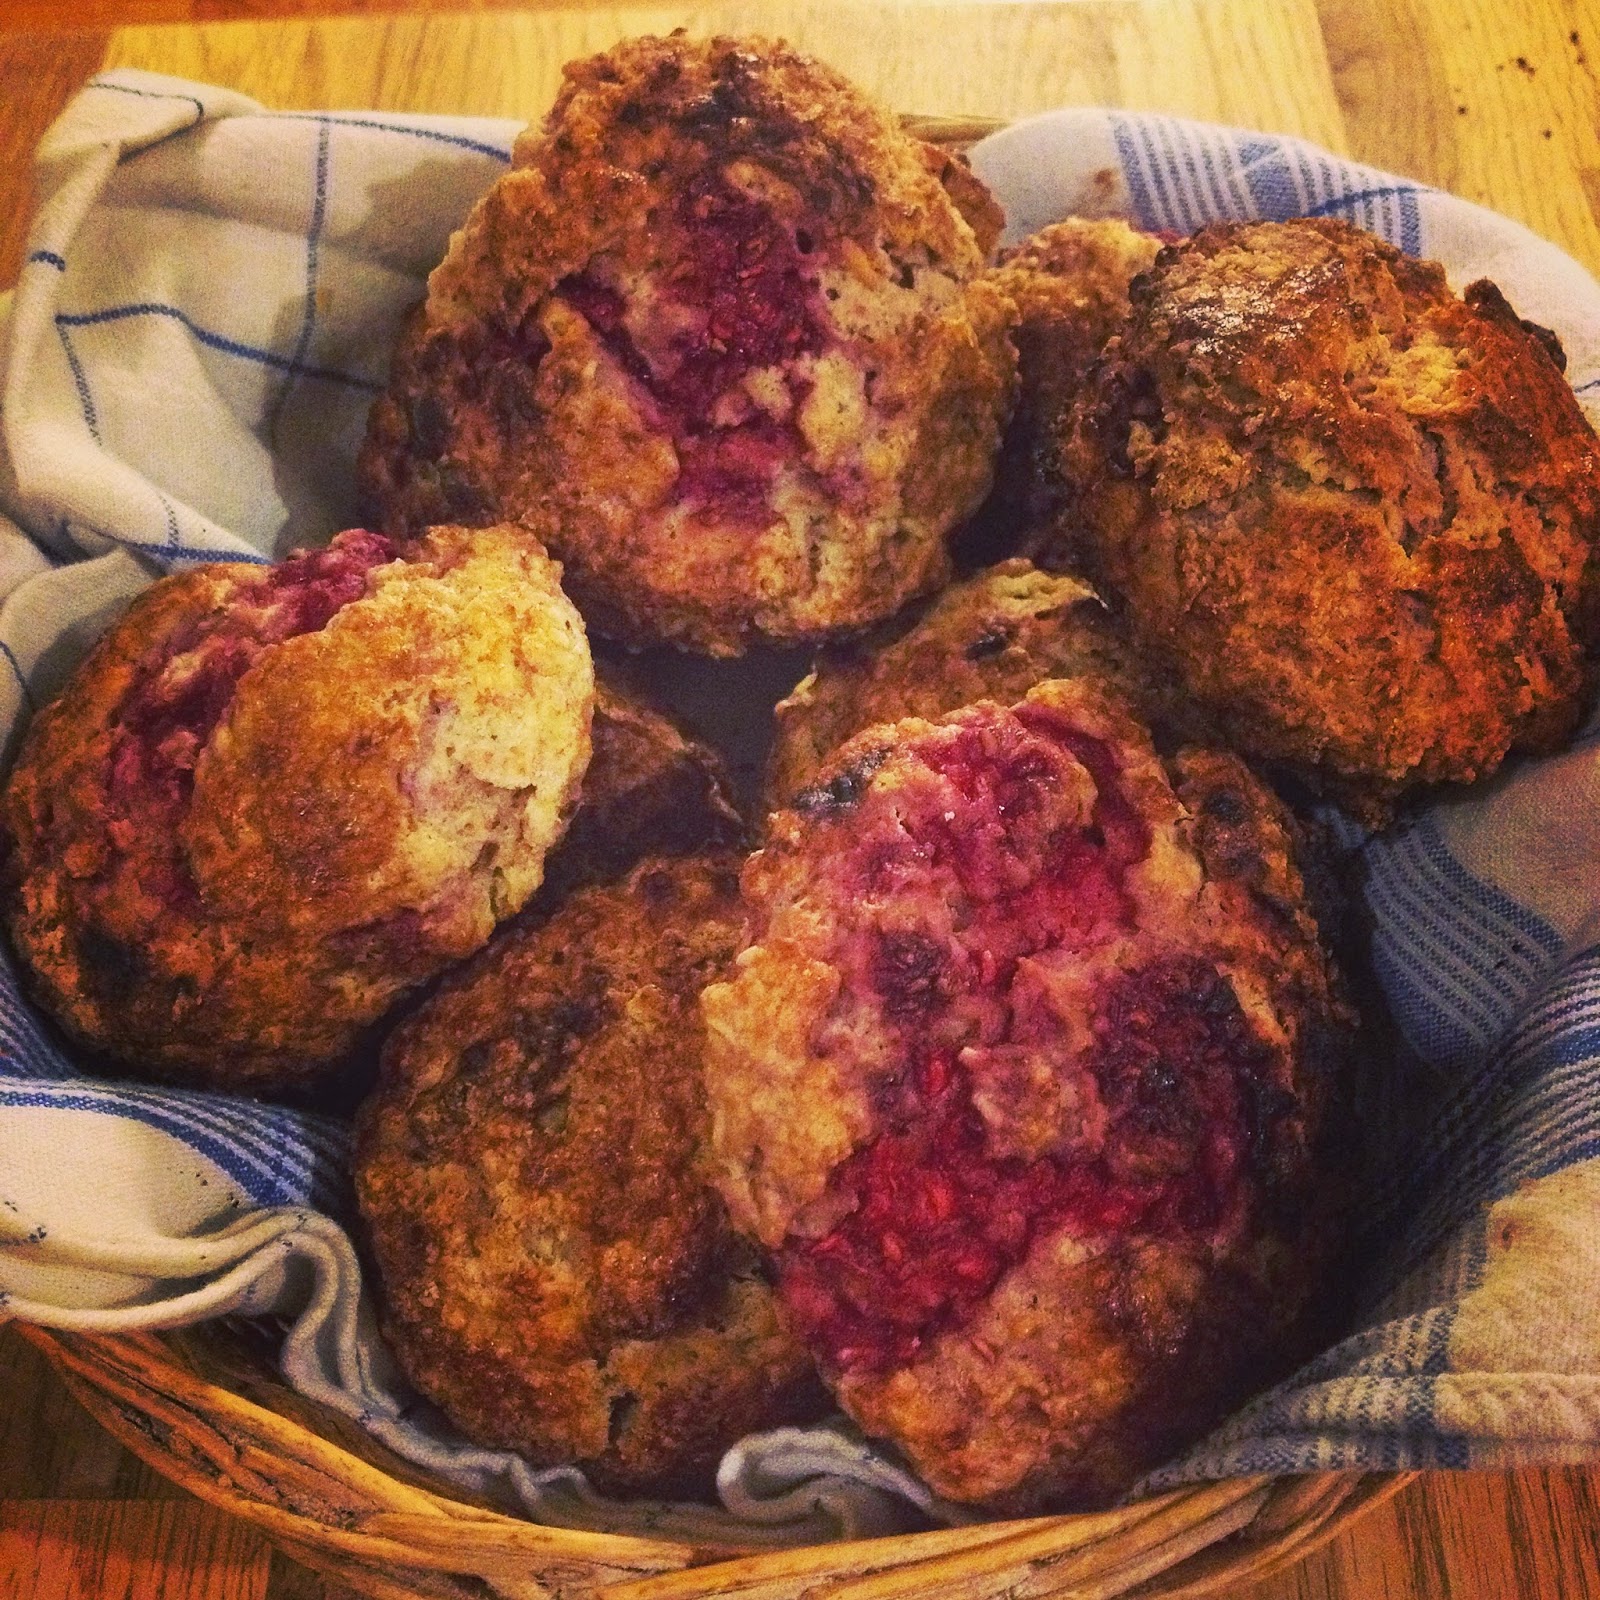
I didn't have a recipe for these, so I was a bit nervy about how they'd turn out - but they got a warm reception from my trusted tasters :) Using frozen fruit does means they don't rise as much as other scones, so just have your oven really hot and don't have your mix too wet. 

Wholewheat spelt coconut and raspberry scones


Slurp.

Ingredients
- 200g wholewheat spelt flour
- 140g self-raising flour (***originally I said white flour and 1 tsp baking powder, but after further experimenting, I decided self-raising is the way to go!)
- pinch of salt
- 50g caster sugar
- 50g dessicated coconut
- 150g butter (I use Flora)
- a handful of frozen raspberries (or fresh blueberries)
- 1 egg, beaten
- 120ml buttermilk

Method
1. Preheat oven to 220 degrees. Sift your flours and salt into a large mixing bowl. Add the coconut.
2. Stir in the sugar.
3. Add in the butter and using your fingertips, rub it into the flour until the mix resembles dry breadcrumbs. As always, handle as little as possible!
4. Add the raspberries
5. Pour in the buttermilk and egg, retaining a little bit of the mix for a glaze. 
6. Bring everything together with your hand.
7. Flour a work surface. Turn the mixture out onto your surface and roll it out to a 4-5cm thickness. Using a scone cutter, cut out your scones and place on a floured baking tray. Brush the tops with your remaining egg-mix.
8. Bake for 15-20mins, until golden-brown.  

Friday, 12 September 2014

scrumptious scones

Scones. The most delectable dumplings of dense, buttery goodness in the world. The champion of the baked goods. Forget about your chocolate chip cookies; mutterings about muffins won't move me in any way. I am a seasoned scone aficionado. A scon-naisseur, if you will ;)

For me, there is nothing quite like a warm, crumbly scone, lathered in melting butter and homemade raspberry jam (and a wedge of cream, if I’m feeling a bit deserving). When I was younger, I would only eat plain scones – much to my father’s chagrin, as I frequently coerced my mother into leaving the raisins out of her signature fruit scones. Now, however, I prefer a flavoured scone – I relish the raisins. I melt over mixed berries. And, most recently, I praise the pear and vanilla.

I discovered this gem of a combination in Keogh’s CafĂ© on Trinity St, which boasts an impressive scone menu, with mouth-watering flavours such as blackberry and apple, cranberry and orange, apple and walnut and many more. I’ve sampled scones all across Dublin, and Keogh’s is one of my favourite places to get my fix. I usually go for the pear and vanilla variety; the juicy chunks of pear are complimented beautifully by the sweetness vanilla, without becoming too sugary-sweet – divine.

I came home after travelling for the summer with an ache in my heart - and my stomach - for a good Irish scone, in particular a pear and vanilla from Keogh’s. As I was spending the first week back at home in Westmeath, this option was not available to me, and so I decided to take matters into my own hands. I’ve baked scones before, but only plain or fruit ones, and not always with the best results. So it was risky, I know. Baking something for the first time with so much of my personal satisfaction riding on the results. But I decided to go for it. 
As Drake would say, you scone-ly live once.

And the results, I have to say, were pretty damn satisfying.


Mmmm-mm. Rise my pretties, rise.


Ingredients
130g unsalted butter, diced
500g plain flour
1 heaped tsp baking powder
70g caster sugar
2 large pears, peeled, cored and diced
1 large egg, beaten
225ml milk
1 tsp vanilla extract
optional: a handful of flaked almonds

Method
  1. Preheat oven to 220 degrees C.
  2. Sift flour and baking powder into a bowl.
  3. Rub the butter into the flour and baking powder using your fingertips, unless the mix resembles dry breadcrumbs. Try to “be light with your hands”, as my mother would say, and handle the mix as little as possible.
  4. Add in the pear. If the pears are really juicy, you will need to reduce the amount of milk.
  5. Add in the egg, milk and vanilla, and bring everything together. I use my hand for this! Retain a little bit of the egg to brush on top of the scones.
  6. Scatter some flour onto a work surface and put the mix out onto this. If your mix is a bit wet, sprinkle some extra flour on the top, before rolling the mixture out to a 4-5cm thickness. Cut out using a scone cutter. Brush the tops with the left-over egg and scatter some flaked almonds on, if it takes your fancy! 
  7. Bake for 15-20 mins or until golden-brown on top. 
  8. None of this "allow to cool" business. Tuck in straight away, while still warm. Ooh baybeh.